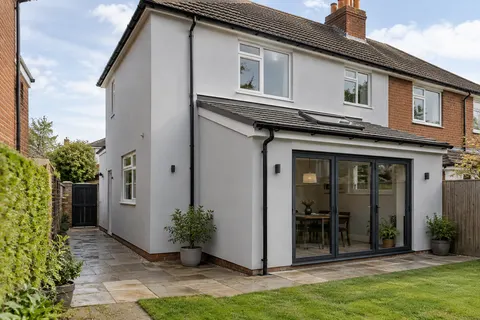
Define the wall and the space needed to work on it
Wall rendering in Runcorn | Gables, sides and rear walls
A single elevation can be a worthwhile project in its own right, whether it is a weathered gable, a damaged side wall or a rear face that no longer suits the property. The scope still extends beyond the flat area receiving render. Working space, adjoining ownership, roof junctions and the final stopping points all need consideration. This Runcorn guide explains how to define that smaller project clearly without assuming that a smaller measured area always means a simpler operation.

On this page
Show the wall in its surroundings
Include a photograph that shows the ground, roof edges and neighbouring structures as well as the main face. A close image of the render cannot show whether the access sits above a conservatory or beside a narrow boundary. Explain what the area is used for and which routes must remain available. These details help the contractor understand the practical job before selecting an access arrangement.
A sketch can be useful where the wall is hidden or impossible to photograph from a single position. Mark the openings, returns and any section above a lower roof. There is no need to create an architectural drawing for the first enquiry. The aim is to avoid presenting an isolated rectangle when the actual elevation contains several different constraints.
| Show | Why it matters |
|---|---|
| Full elevation | Openings, returns and height |
| Space below | Suitable access and protection |
| Boundary | Authorisation and working arrangements |
| Top and base | Permanent weathering and termination |
| Fittings | Removal, alterations and reinstatement |
- Set the edges Decide where new render stops against brick, stone or an existing finish.
- Prepare the background Remove loose material, repair masonry and prepare suction and surface key. Existing paint needs a specified removal or alternative treatment.
- Base coat Built up to level the wall, with mesh where backgrounds change or crack.
- Finish Matched to the rest of the house or chosen as a deliberate contrast.
- Shed the water Copings, sills and the base bead keep rain off the top and away from the bottom edge.
The usual order of work. The survey and the chosen products decide the actual steps.
Clarify the boundary before relying on access
A wall may stand close to a boundary or form part of a shared arrangement. Establish who can authorise the proposed work and what access is available. Do not assume that scaffolding, materials or protective coverings can be placed on adjoining land without agreement. The relevant arrangement needs to be resolved before the programme depends on it.
The article on shared-boundary working space sets out useful information for that discussion. It does not determine ownership or legal rights from an address. Where those matters are uncertain, appropriate advice is needed. The rendering scope should then reflect the agreed working area rather than leaving the access question to be settled on the first morning.
Decide whether the whole face needs renewal
A local defect may be suitable for repair, while a sound but unwanted colour may be a coating project. Renewing the complete wall should have a reason based on condition, compatibility or the intended appearance. The survey needs to explain the chosen intervention and any uncertainty that requires a trial or further inspection.
If the old covering will be removed, agree how the exposed background is reviewed. Repairs or preparation may be needed before the new system can proceed. The quote should distinguish included work from findings that require approval of a changed scope. This avoids a small-wall enquiry becoming an undefined instruction to carry out whatever work is discovered after stripping begins.
Choose the stopping points as part of the design
A corner or architectural break can provide a clearer transition than a line across an uninterrupted surface. Show whether the return around the corner is included and how the new work meets the retained finish. The junction should be suitable technically as well as visually. A natural-looking division is not enough if it leaves an exposed or poorly weathered edge.
Texture and colour matching need realistic discussion. A fresh monocouche finish beside an older face may differ even where the nominal colour is known. A fine silicone finish offers another appearance but does not remove the need for suitable preparation. A sample should demonstrate the intended relationship with retained surfaces, not imply that all weathering can be reproduced immediately.
Check the top, bottom and openings together
The wall needs a suitable relationship with sills, roof edges and adjacent ground. A new build-up can reduce an existing projection or change the reveal beside a frame. Identify any necessary alteration before application. Where another trade is responsible, put that work into the sequence so the render does not become a temporary substitute for an unfinished permanent detail.
At the base, consider the actual construction and surrounding level rather than extending the material indiscriminately downwards. Drainage, ventilation and damp-proofing details must continue to function as intended. A section drawing can be especially useful where paving has changed or where the wall meets a lower roof. The finished arrangement should be understandable before it is built.
Account for the small things attached to the face
A downpipe, light or cable may occupy very little area yet interrupt preparation and finishing. Decide which fittings will be removed and reinstated, which will move and which will remain protected. Some alterations need a specialist or utility provider. The rendering contractor should not be presumed to own every service because it happens to cross the wall.
If the face is part of a future whole-house project, retain the system and colour information and think through the later stopping points. Today's limited work should not create an avoidable awkward junction for the next phase. Phasing can be useful, but it needs a plan for appearance, access and the intervals between stages.
Inspect the complete operation, not just the new colour
The final review should include retained surfaces, reinstated fittings and the condition of the working route. Compare the rendered face with the approved sample after the relevant drying stage, and inspect the agreed junctions closely. Record any issue by location so that it can be assessed against the scope. A broad complaint about the wall is harder to resolve than a precise observation.
The Runcorn rendering overview helps compare this route with repairs and other finishes, while the cost guide explains the allowances behind a quotation. Keep the final specification with photographs of significant concealed work. A single wall may be a limited project, but its material history and edge details can still be important when future maintenance is planned.
Common questions
Can a garden wall use the same render as a house?
It needs its own assessment. A freestanding wall has different exposure and top and ground relationships from a house elevation. Product suitability and the coping, base and moisture details should be considered rather than copying the house specification automatically.
Will only rendering one side affect the appearance?
It can create a visible transition. Agree the colour, texture and stopping point beforehand, using a sample where useful. That makes the limited scope deliberate rather than leaving the junction with the older finish as an unexpected result.
See housing and planning information for Runcorn and nearby places, including the source and geography behind each figure.